
A stuck bit in an impact driver is one of those frustrations that stops a project cold. Whether it’s a Phillips head that won’t budge or a socket bit that’s seized in the chuck, the problem often feels worse than it is, and it’s almost always fixable without sending the tool to a repair shop. The good news: most stuck bits come loose with straightforward techniques that require nothing more than tools already lying in a typical home garage. This guide walks through why bits get stuck, how to remove them safely, and how to prevent the problem from happening again.
Table of Contents
ToggleKey Takeaways
- A stuck bit in an impact driver can usually be removed safely at home using simple techniques like pliers, penetrating oil, and heat without requiring professional repair.
- The primary causes of stuck bits include rust and corrosion, dust accumulation in the chuck, over-tightening during installation, and resistance during use that causes the chuck to clamp down.
- Gently wiggling locking pliers on the bit shaft while applying steady outward pressure is the quickest first step to release most stuck bits.
- Combining penetrating oil applied to the chuck seam with gentle heat from a heat gun dramatically increases success rates for stubborn bits that resist simple removal.
- Prevent future sticking by cleaning the chuck regularly, allowing bits to cool between heavy use, matching bit quality to your chuck condition, and avoiding forced installation.
- Controlled reverse rotation pulses from the impact driver can shock a stuck bit loose from the inside, but only after heat and oil treatments when other methods haven’t worked.
Why Bits Get Stuck in Impact Drivers
Impact drivers use rotational force plus rapid hammer-like impacts to drive fasteners and turn bits. That hammering action is powerful, and occasionally it works against you. When a bit meets resistance (stripping out, hitting a knot in wood, or catching on metal), the driver’s chuck can clamp down with surprising force, locking the bit in place.
Rust and corrosion also play a role, especially if bits have been sitting in humidity or saltwater environments. The bit shaft oxidizes, expands slightly, and grips the chuck’s internal jaws tighter. Dust and debris stuck inside the chuck compound the problem. Some cheaper bits and chucks have looser tolerances, making binding more likely.
Another culprit: over-tightening. If a user manually screws a bit into a worn or slightly oversized chuck before using the driver, that pre-tension can make removal much harder than it should be.
Quick Release Techniques
Using Pliers or a Wrench
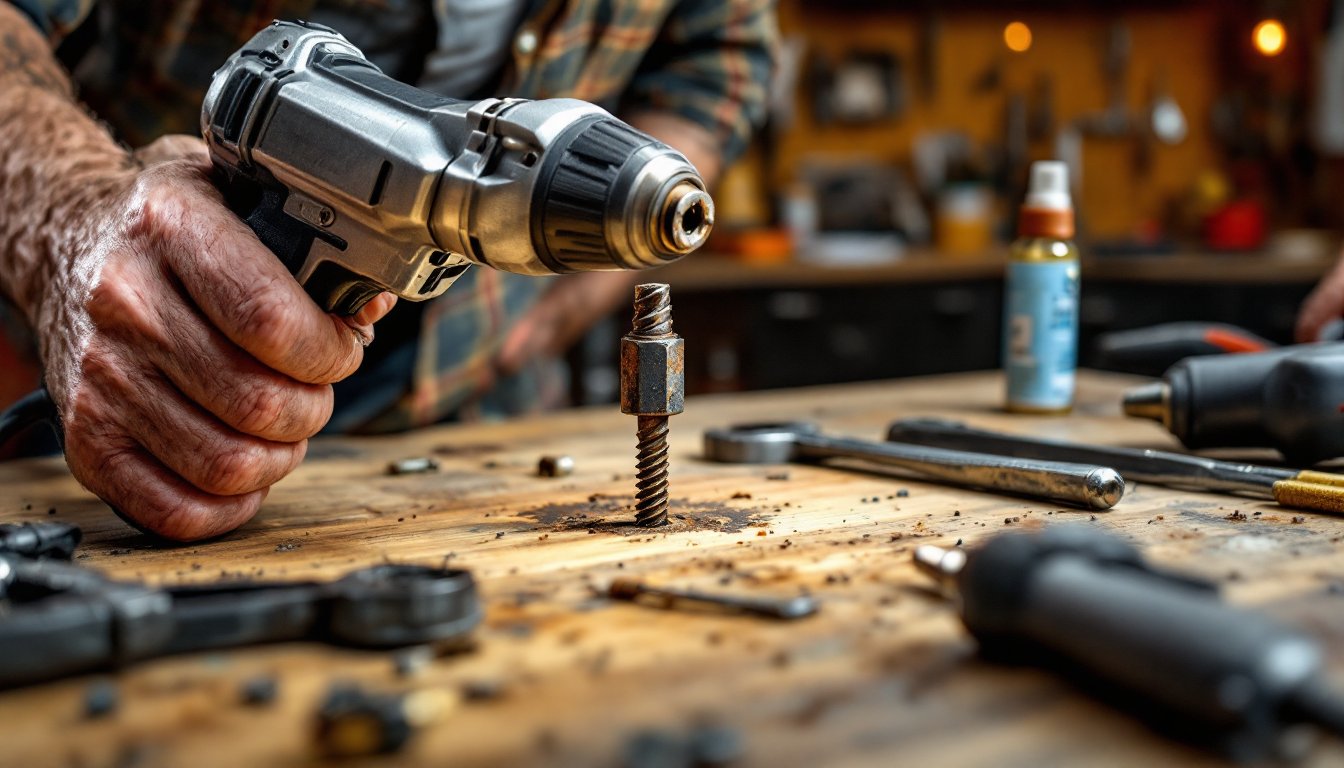
Start here. A stuck bit often comes free with simple mechanical leverage. Clamp a pair of locking pliers (such as Vise-Grips) onto the bit shaft just below the chuck, gripping it as tightly as comfortable. Without forcing, gently wiggle the pliers side-to-side and up-and-down while slowly pulling outward. The wiggling action breaks rust bonds and helps the chuck relax its grip.
If the bit is slightly recessed in the chuck, try an adjustable wrench on the bit shaft instead, using the same gentle wiggle-and-pull technique. Work slowly, jerking hard can strip the bit or bend the shaft. If it shifts even slightly, stop wiggling and pull steadily outward. Most bits release within 30 seconds using this method.
For hex-shaft bits, you can fit a hex wrench directly into the bit socket for extra grip. Turn gently, counterclockwise to release, while pulling. This avoids gripping the shaft itself and reduces risk of deforming it.
Applying Heat and Penetrating Oil
If pliers don’t work, heat and time often do. Spray the chuck seam (where the chuck halves meet) generously with penetrating oil like WD-40 or PB Blaster. Let it soak for 5–15 minutes. The oil seeps into tiny gaps and breaks down rust and debris.
While the oil works, apply gentle heat with a heat gun or hair dryer set to high, holding it 2–3 inches from the chuck for 1–2 minutes. Heat expands the chuck metal slightly, easing internal tension on the bit. Avoid an open flame or torch near the plastic handle, most impact driver grips soften around 140–160°F (60–71°C).
After heating, wipe excess oil away and try pliers again. The combination often succeeds where either method alone might stall. If still stuck, wait another 10 minutes for the oil to penetrate deeper, then retry. Patience beats aggression every time.
Advanced Removal Methods
The Reverse Rotation Method
If heat and oil haven’t worked, try engaging the driver itself, but carefully. Set the impact driver to reverse mode and squeeze the trigger gently for half-second pulses. The reverse impacts can shock the bit loose from the inside out, without the danger of spinning it hard enough to damage the chuck or drive.
Use light, controlled trigger pressure. The goal is a gentle tap-tap-tap action, not full power. After 3–4 pulses, stop and try pulling the bit out with pliers. If it hasn’t budged, let the chuck cool for a few minutes (reverse rotation generates friction), then repeat.
For stubborn cases, apply penetrating oil again before using reverse rotation. The combination of mechanical shock and reduced friction is highly effective. If the driver’s reverse function isn’t working or the bit still won’t release after 2–3 cycles, the chuck may be damaged and warrant professional service or replacement.
Prevention Tips for Future Use
Clean the chuck regularly. Dust and dried lubricant accumulate inside, increasing friction and binding. Every few weeks, spray a small amount of penetrating oil into the chuck while rotating it gently, then wipe it out. A clean chuck is a happy chuck.
Let the bit cool between heavy use. Friction from repeated impacts warms the bit and chuck, expanding both slightly. If a bit feels warm to the touch, set it aside for 5 minutes before removing it. This simple habit reduces sticking dramatically.
Match bit quality to your chuck. Premium bits have tighter manufacturing tolerances and hardened shafts that resist deformation. Cheap bits with slightly oversized or soft shafts are more prone to binding in worn chucks. Invest in bits from established brands like Bosch, DeWalt, or Milwaukee if your chuck is a few years old.
Don’t force a tight bit during installation. If a new bit doesn’t seat smoothly into the chuck, don’t muscle it in. That pre-tension is hard to overcome later. Instead, clean the chuck seams with a dry cloth and try again.
Avoid dropping the driver with a bit installed. Impact from a hard fall can jam the bit into the chuck. Always store the driver with the bit removed or loosely seated.
